Showing posts with label porsche 911. Show all posts

Monday, September 22, 2008

NOP Blue’s new home

New Old Porsche (NOP) Blue has a new home. The 1974 Porsche 911 has been painted, everything but the front and rear bumper, and relocated to a spot out of the way from the busy activities at the shop. Warren found a patch of clear, mostly level ground and also arranged for a couple of five by twelve sheets of aluminum sheeting. Saturday we raked out some gravel to level things out and fill in some small holes, laid some plastic as a moisture barrier, followed that with some plywood, and then laid the aluminum on top. This will provide a good surface for working on NOP Blue, easily supporting jack stands, etc. and making rolling around on a creeper really easy.

I’ve ordered an enclosed canopy that will surround the Porsche and keep the moisture out in the coming winter months. This will be plenty big to work on the car. Other progress has been made: I’ve ordered a wiring harness from Painless Wiring. I’m sure this project will test the company’s name. Now I’ve got a list of “while you’re at its” including MSD Ignition modules and an optical replacement for the points.

Why NOP Blue?

If you look back in the archives you will see the inspiration for the Porsche’s paint scheme comes from Ducati’s “New Blue” project. Also, NOP is a computer science abbreviation for No Operation, which seems a perfect term for the car at this time.

Reddit It | Digg This | Add to del.icio.us

Saturday, October 06, 2007

Test Fit for the Porsche 911

The 1974 Porsche 911 project is making progress with the recent test fitting of the major body panels. A few weeks earlier the inner compartments and jambs were painted and now the team at Ocean Paint and Body are getting the doors, lids and fenders placed to verify everything will go together as planned when the paint work is done.

You can see here that a test panel has been used to check the graphics scheme and colors. I like the look of the Porsche silver and blue and have decided to keep the looks simple with just the stripes. Once the car gets painted it will be a nice looking rolling chassis. After that, the real fun will start for me as I’ll have to try and remember 1) where all the pieces are and, 2) how to put them all back on the Porsche.

I also need to complete the work on the front and rear fiberglass bumpers. I’ve already fit the bumpers to the car but they require a fair amount of work to get to a finished state. The rear is not too far off but I need to have the engine back in the car to finalize the exhaust opening. The front bumper requires more work to get the openings for the turn signal and marker lights sorted.

Digg It | Reddit It | Add to del.icio.us

Tuesday, September 25, 2007

A True Boxer Engine

Today is Mickey’s first birthday ...

I thought it would be fun to pass along a few pictures of Mickey hanging out at the shop while the Porsche was being worked on, these are from June so he’s quite a bit bigger now. You can see that Mickey is a real shop dog and enjoys being around the cars, especially the Porsche 911.


For those of you wondering about the name, no, Mickey is not named after the mouse but after the Irish boxer in the excellent movie Snatch.

Digg It | Reddit It | Add to del.icio.us

Sunday, September 16, 2007

Kristallsilber: The Color of Progress

Today marked what feels like a major milestone in the restoration/transformation of the 1974 Porsche 911 as the first coats of Kristallsilber were applied to the interior, jambs, engine compartment and trunk areas. The original Porsche color looks great and it’s exciting to imagine what the car will look like with the Cobaltblau trim added.

There is still a lot of work to do with this project and even with the paint complete it will just be a more pretty rolling chassis. One of these days I’m going to be forced to remember how to put the thing together again along with figure out some of the planned improvements such as the new wiring harness with modern blade fuse box.

All of this will come in time.

Digg It | Reddit It | Add to del.icio.us

Friday, August 31, 2007

A Great Porsche Project Handbook

Insanity is believing you Will run out of projects ...

When I first took on the 1974 Porsche 911 I thought I’d do some general maintenance and maybe even some performance modifications before taking on the larger challenge of paint, body, and interior work. Being new to the Porsche 911 model I wasn’t sure where to start, looking in the catalogs and the online forums I found many cool ideas. It quickly became apparent that the cost of those ideas was going to add up so my next bright idea was to look for recommendations from a trusted source.

Wayne Dempsey is one of the founders of Pelican Parts, an online Porsche parts dealer that has established a strong following in the Porsche community. Not only do Pelican Parts sell items for Porsches they have a good library of technical articles and a very active user forum.

So back to ideas of the 1974 Porsche 911, I came across the book 101 Projects for Your Porsche 911, written by Wayne Dempsey and knew that thought it would be a worthwhile investment. This is one aspect of the project that has turned out as planned. The book is very complete in offering both maintenance topics and performance enhancement topics. Guidelines for technical skill, time required, tools, and parts are provided making it very manageable to plan for and execute on one of the projects. Best of all, the book is not a platform for selling more parts, I’ve actually found myself not buying parts based on recommendations in 101 Projects for Your Porsche. I highly recommend this to anyone who works on their Porsche or who is looking for great ideas to take to their shop of choice.

Saturday, August 25, 2007

A Final Resting Place?

The new home for the 1974 Porsche 911 is a corner at Ocean Paint and Body in Oceanside. The car, engine and transaxle are covered to protect them from the elements and the occassional seagull passing over. For a while I thought this corner of the shop would be the final resting place for the little brown Porsche 911 but Warren had a different idea.

Posted by Picasa

Last Ride of the Porsche 911

When I started this project I didn't think the 1974 Porsche 911 would leave the garage on the back of a tow truch but that's how it played out. At least its getting some sun and the dust blown off.

Posted by Picasa

Kat and the 1974 Porsche 911

Here's Kat jumping for joy as the Porsche 911 is brought to rest on the tow truck. Not only is Kat happy to have space in the garage for her Honda Odyssey, she's ecstatic to not have to look at the poor old brown 1974 Porsche 911. You can see my new (Kat's old) minivan in the background - that's a post for another time.

Posted by Picasa

Porsche 911 Leaving the Garage

The 1974 Porsche 911 as it is being rolled out of the garage and onto the tow truck. There's nothing much left of the chassis, only enough to make it reasonably easy to roll the car around. The horizontal six engine and transaxle have already been loaded onto the truck.

Posted by Picasa

Homer's Odyssey and the Porsche 911

This has nothing to do with Homer but it does have to do with an Odyssey and a 1974 Porsche 911; this is where you find out what derailed this project that previously seemed to be moving forward at a reasonable pace. In about July of 2006 I decided to surprise my wife Kat with a new Honda Odyssey. She had minivan envy as several of her friends had new new rides and I had a decent sized bonus check from my previous employer. Kat not only wanted a new van she needed one, her 2000 Honda Odyssey had about 125,000 miles on the odometer and the new vans with the electric side doors and side-impact airbags seemed like a much safer way to transport our three little ones. I fished around for color ideas, got the finances in order, and headed off to the local dealership to buy a new Honda Odyssey. Kat had no idea and that night when she came home from a school meeting the new Odyssey was in the driveway. The only problem was that the Odyssey was in the driveway and not in the garage because the 1974 Porsche 911, supported by four jack stands, was taking up its spot.
The following weekend it was time to gather up the scattered pieces of the 1974 Porsche 911, call the tow truck, and have the entire project relocated to the shop managed by my Father-in-Law, Warren (Ocean Paint and Body in Oceanside). I have to say I was somewhat relieved to have the Porsche 911 out of the garage and it removed some of the pressure to complete the project.
At this point the 1974 Porsche 911 was (and still is) nothing more than a rolling chassis with the engine and transaxle removed, the wiring harness pulled, no lights, interior, nothing. We pushed the Porsche to a far corner of the shop lot, covered it with the newly acquired car cover, and mission accomplished: the new Honda Odyssey fits nicely in the garage. The problem is that now instead of having a project just waiting for me to get home at night or dedicate my weekend to, I have to travel to work on the 1974 Porsche 911. This combined with not having my tools handy and there be many other things to spend my time on (kids, new job, motorcycles) meant that the project completely stalled.
And now you know.

Friday, August 24, 2007

What the future holds

For anyone wondering what my current thoughts are regarding the paint scheme for the 1974 Porsche 911 here's a hint. This is a modern replica of "Old Blue" the 1977 Daytona winning Ducati.

Posted by Picasa

Blog renamed

You may (or may not) have noticed that I've renamed this blog 1974 Porsche 911 from the original "Porsche Build or Bust". Why you ask, to make it easier to find in the search engines. Yes, I am adopting the best practices that I talk about all day and build into products within my own sites. I don't expect to make this 1974 Porsche 911 the hottest spot on the internet but it shouldn't be completely hidden either. If you're reading this post I have to assume you've found the new url and are updating your bookmarks.
I've also created two other blogs to sell off my current (small) stable of motorcycles. More on this in future but if you're interested you can click the links to find out more about my 2003 Suzuki SV650S and my equally nice 2003 BMW F650GS Dakar.

Thursday, August 23, 2007

Still no updates

Okay, I have to apologize as several friends have asked "where are the updates for the 1974 Porsche 911?" I promise I am working on it and will make time soon to get the pictures updated, etc. This project has been on the back burner (again) due to work, family, and other distractions - this is great weather for a motorcycle ride.
If you really want to stay current you can subscribe to the RSS feed for this 1974 Porsche 911 blog, see the "subscribe now" widget in the top right column.

Tuesday, June 19, 2007

Irony

It's pretty ironic that one of the last posts to the 1974 Porsche 911 blog was in regard to "gumption". So what happened you may ask. Well I promise to provide full updates on the 1974 Porsche 911 over the next couple of days so you can see where progress stopped and where, thanks to my father-in-law, it's picking up again.

Monday, May 29, 2006

Gumption and the challenge of making real progress

It’s been a while since I’ve made a post but this post comes with progress. At least it feels like progress … sure has been a long time coming. This weekend (Memorial Day weekend) I managed to actually get the fender flares attached to the 1974 Porsche 911. This took a few hours finalizing the sheet metal (pretty much me beating the crap out of the area where the flares attach so that it resembles a sack of walnuts). With the sheet metal in order primer was applied – and now I know why even something as seemingly simple as blowing paint on a car takes practice – not as easy as it looks. My son Michael helped with the primer, masking and clean-up so at least we had some fun.

I gave the primer the night to cure and the next morning set about actually gluing the flares to the car. This took about an hour of final fitting (you can never be too close) and then on with the panel adhesive. For those of you who may care, I used Fusor # 127EZ. Liberally applied one set of tubes (it’s a two-part adhesive) was enough for both flares. You have about an hour of working time and the flares were set well within this time. I also glued my shorts to my leg hair but that’s another story.

Twenty-four hours later (actually more like twenty-eight) I pulled the screws and the flares stayed on, a good sign for sure. Even with some tugging everything looks to be staying place. Today I actually spread some filler, the heavy-duty Mar-Glass that includes fiber glass strands in with the filler. The stuff a bit messier then normal body filler but a lot stronger and does a great job of smoothing the gap around the flare. I’ll do the rough and then hire someone with skill to do the actual finish work. Also used some seam sealer to ensure that the fit between the wheel wells and flares are water tight.

I’ll put this weekend down as a win.

Saturday, April 08, 2006

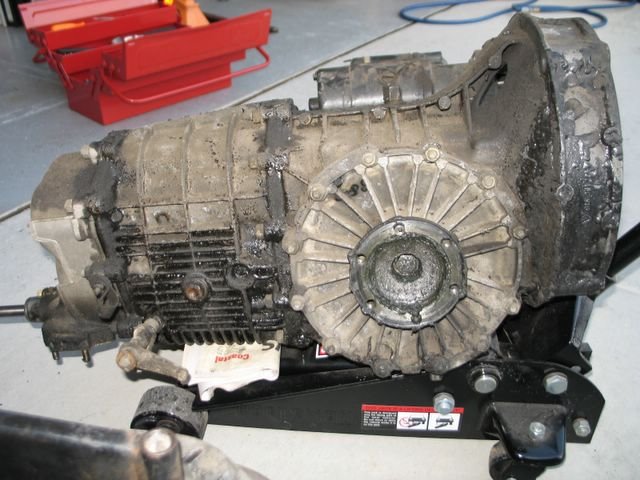
The transaxle is filthy, pretty much covered in oil from top to bottom. It's going to take a good steam cleaning to get the crud off. I'm not planning on tear-down this go-round but at some point I'm going to have to get into it and replace the gaskets. It seems like the bulk of the oil is coming from the front, maybe from the shift rod or speedo drive? All I know is it's a filthy little pig. Posted by Picasa